トップページに特定の記事を表示させたい
トップページはユーザーが最初にアクセスする玄関ページです。
「玄関」ということで、できるだけキレイに見せたいですし、どんなサイトなのか「目的」や「情報」を明確に伝えたいページでもあります。
賢威の場合は、キャッチコピー入れる機能があるのでメイン画像で訴求することが多いように思います。
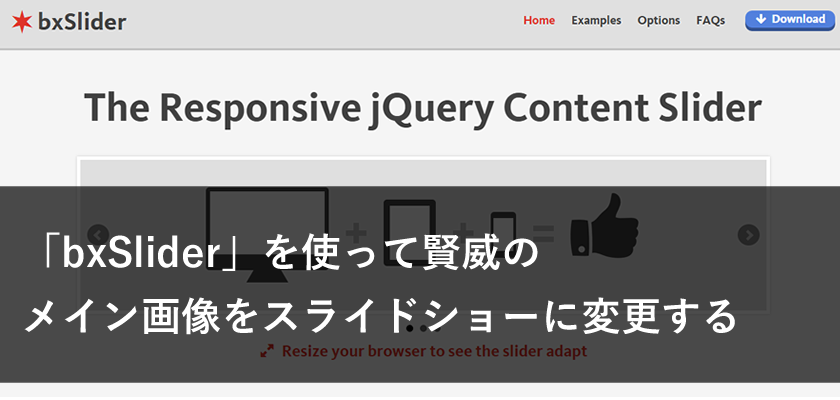
画像で訴求する場合には動きをつけるために以前に紹介した「bxSlider」を利用してみてもいいかもしれません。
「bxSlider」で賢威のメイン画像をスライドショーに変更する
しかし、メインビジュアルのカスタマイズではなく、「特定の記事を表示させたい」ということもあります。
そこで、今回はWordPressの機能を利用した、ウェルカムメッセージの設定をしたいと思います!
今回の記事の目的
- 「先頭に固定表示」を使ってみよう
- 賢威6.2テンプレートで設定してみる
- 賢威7テンプレートでも設定してみる
トップページに「専用のウェルカムメッセージを掲載したい」と考えたことはありませんか?
いさろぐでもトップには「カスタマイズをはじめる前に」という文章を入れています。
このような掲載は「メインインデックスのテンプレート (index.php)」を編集し直接HTMLを記述することで対応可能です。
しかし、メッセージを変更したい時などに都度テンプレートをカスタマイズしたくありませんよね・・・。
そんな時に便利な機能がWordPressのデフォルトの機能である「先頭に固定表示」。
今回はこちらの機能を利用してトップページに特定の記事を表示させてみましょう。
投稿画面をチェックしてみましょう
「先頭に固定表示」はWordPressの投稿画面にデフォルトで設置されています。
意外と気付きにくいのですが、「公開」のエリアの「公開状態」の中に入っている「この投稿を先頭に固定表示」というチェックボックスです。
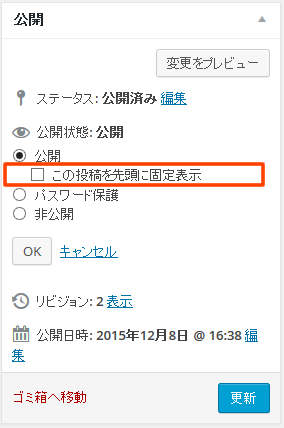
今回紹介する機能はこちらで、このチェックボックスをチェックするだけで利用できます。
実際にチェックをして、どのような動きになったのかをみてみましょう。
賢威6.2で動きをチェック
では実際に賢威6.2テンプレートで「この投稿を先頭に固定表示」をチェックした記事の動作をみていきます。
テストのために新規で何記事か投稿しておきます。

そうすると、まずは上記のような並びが標準の状態です。
次にここでは「トップページに固定したい記事」というタイトルの記事にチェックを入れてみます。
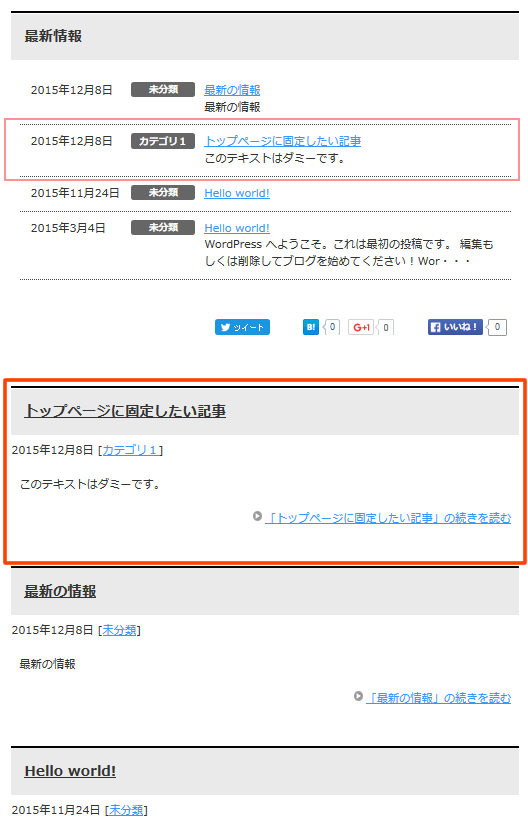
すると賢威6.2では「最新情報」の場所では変化はありませんが、下部の新着情報一覧では先ほどの記事が一番上に固定されていることがわかります。
動きとしてはこのように「先頭に固定表示」させることができ、文字通りの機能となっているんです。
「最新情報」でも固定表示をさせる場合
●テーマのための関数 (functions.php)を調整
$r = new WP_Query(array('showposts' => $num_of_posts, 'nopaging' => 0, 'post_status' => 'publish', 'cat' => $catid, 'ignore_sticky_posts' => 1));
$r = new WP_Query(array('showposts' => $num_of_posts, 'nopaging' => 0, 'post_status' => 'publish', 'cat' => $catid, 'ignore_sticky_posts' => 0));
「ignore_sticky_posts」を「0」とすることで、先頭固定を有効にすることができます。
賢威のデフォルトでは無効にしているようです。
しかしこれでは「専用のウェルカムメッセージを掲載したい」というカスタマイズと少しイメージが違いますので、新着情報エリアから飛び出して表示させてみましょう。
「この投稿を先頭に固定表示」にチェックがあった記事を別枠で表示させる
デフォルトの機能を利用して「チェックがあったかどうか」を条件分岐として、カスタマイズをおこなってみたいと思います。
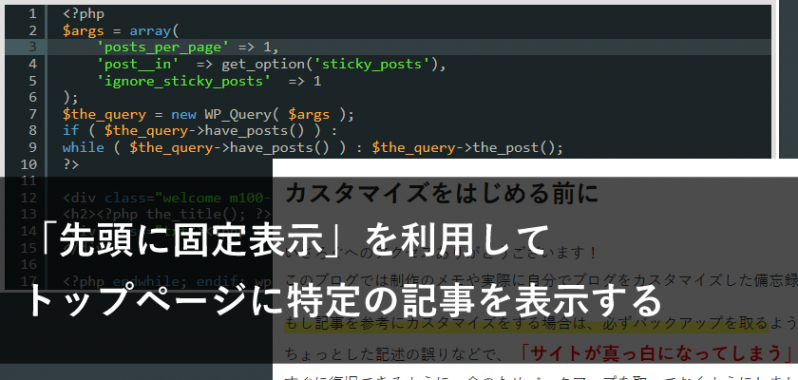
●「メインインデックスのテンプレート (index.php)」に追記
<?php
$args = array(
    'posts_per_page' => 1,
    'post__in'  => get_option('sticky_posts'),
    'ignore_sticky_posts'  => 1
);
$the_query = new WP_Query( $args );
if ( $the_query->have_posts() ) :
while ( $the_query->have_posts() ) : $the_query->the_post();
?>

<div class="welcome m100-b">
<h2><?php the_title(); ?></h2>
<div class="txt"><?php the_content(); ?></div>
</div>

<?php endwhile; endif; wp_reset_postdata(); ?>
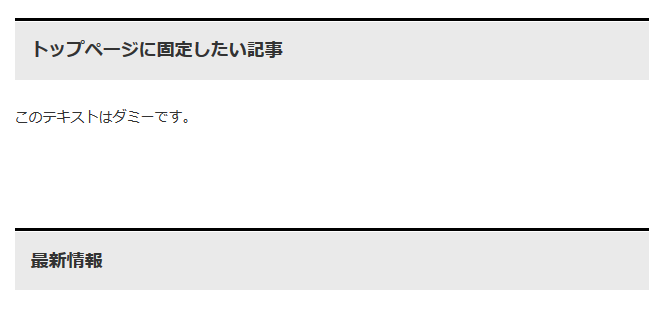
固定表示させたい場所に上記のコードを貼り付けます。
上記の例では「タイトル」と「本文」のみの表示としています。
3行目で表示の数を「1」と指定しています。
2つの記事を固定表示させたい場合は「2」と設定しましょう。
この場合日付の順で固定表示の記事が並びます。
●概要とリンクのパターン
<?php
$args = array(
    'posts_per_page' => 1,
    'post__in'  => get_option('sticky_posts'),
    'ignore_sticky_posts'  => 1
);
$the_query = new WP_Query( $args );
if ( $the_query->have_posts() ) :
while ( $the_query->have_posts() ) : $the_query->the_post();
?>

<div class="welcome m100-b">
<h2><?php the_title(); ?></h2>
<div class="txt"><?php the_excerpt(); ?></div>
<p class="link-next"><a href="<?php the_permalink() ?>">「<?php echo(get_the_title('', '', false)); ?>」の続きを読む</a></p>
</div>

<?php endwhile; endif; wp_reset_postdata(); ?>
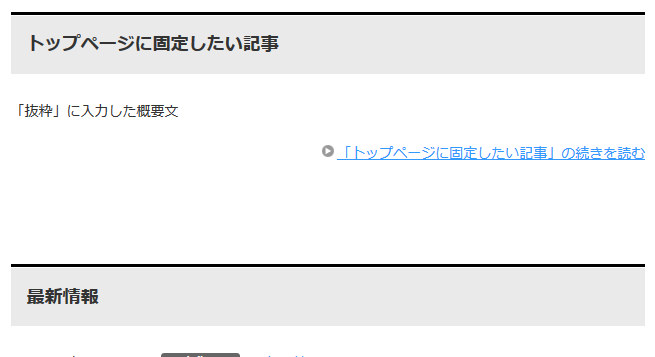
こちらの例では「タイトル」と「概要文」「記事へのリンク」を表示しています。
概要を表示させ「続きを読む」という感じで個別記事へ誘導するパターンです。
出力部分に装飾を付けたい部分はこの例では「class=”welcome”」などを「css」にて対応してみましょう。
いさろぐでも「カスタマイズをはじめる前に」とし概要文を書き、詳細は「バックアップの参考記事はこちらから」として誘導しています。
チェックされた記事を一覧から除外
今回のカスタマイズでは「この投稿を先頭に固定表示」は1記事と想定していますが、別枠で表示させているのに新着情報一覧にも表示されていると少し違和感があるように思えます。
そのため、トップページの一覧の箇所にもカスタマイズをおこない、チェックした記事が表示されないように対応しておきます。
上部の「最新情報」を調整
●テーマのための関数 (functions.php)を調整
$r = new WP_Query(array('showposts' => $num_of_posts, 'nopaging' => 0, 'post_status' => 'publish', 'cat' => $catid, 'ignore_sticky_posts' => 1));
$r = new WP_Query(array('showposts' => $num_of_posts, 'nopaging' => 0, 'post_status' => 'publish', 'cat' => $catid, 'ignore_sticky_posts' => 1, 'post__not_in' => get_option( 'sticky_posts' )));
「’post__not_in’ => get_option( ‘sticky_posts’ )」を追記することで、固定表示にチェックされた記事を除外しています。
下部の「新着情報一覧」を調整
●修正前
<?php while (have_posts()) : the_post(); ?>

<div class="post">
<h2 class="post-title"><a href="<?php the_permalink() ?>" title="<?php the_title_attribute(); ?>"><?php the_title(); ?></a></h2>
<p class="post-meta"><span class="post-data"><?php the_time(get_option( 'date_format')); //the_time('Y年m月d日') ?></span> <?php if (!is_tag()) { get_category_keni(', '); } ?></p>
<div class="contents clearfix">

	<div class="article">

	<!--アイキャッチ画像-->
	<?php if(has_post_thumbnail()){ ?>
	<div class="left">
	<a href="<?php the_permalink() ?>" title="<?php the_title_attribute(); ?>"><?php echo the_post_thumbnail(); ?></a>
	</div>
	<?php } ?>
	<!--/アイキャッチ画像-->

	<!--本文抜粋-->
	<?php the_excerpt(); ?>
	<p class="link-next"><a href="<?php the_permalink() ?>">「<?php echo(get_the_title('', '', false)); ?>」の続きを読む</a></p>
	<!--/本文抜粋-->

	</div>
	<!--/article-->

</div>

</div>
<!--/post-->

<?php endwhile;

pager_keni();


else : ?>

<h2>お探しの記事は見つかりませんでした。</h2>
<div class="contents">
<p>検索キーワードを変更し下記より再検索してください。</p><br />
<?php get_search_form(); ?>
</div>

<?php endif; ?>
●修正後
<?php while (have_posts()) : the_post(); ?>
<?php if(!is_sticky()): ?>

<div class="post">
<h2 class="post-title"><a href="<?php the_permalink() ?>" title="<?php the_title_attribute(); ?>"><?php the_title(); ?></a></h2>
<p class="post-meta"><span class="post-data"><?php the_time(get_option( 'date_format')); //the_time('Y年m月d日') ?></span> <?php if (!is_tag()) { get_category_keni(', '); } ?></p>
<div class="contents clearfix">

	<div class="article">

	<!--アイキャッチ画像-->
	<?php if(has_post_thumbnail()){ ?>
	<div class="left">
	<a href="<?php the_permalink() ?>" title="<?php the_title_attribute(); ?>"><?php echo the_post_thumbnail(); ?></a>
	</div>
	<?php } ?>
	<!--/アイキャッチ画像-->

	<!--本文抜粋-->
	<?php the_excerpt(); ?>
	<p class="link-next"><a href="<?php the_permalink() ?>">「<?php echo(get_the_title('', '', false)); ?>」の続きを読む</a></p>
	<!--/本文抜粋-->

	</div>
	<!--/article-->

</div>

</div>
<!--/post-->

<?php endif; ?>
<?php endwhile;

pager_keni();


else : ?>

<h2>お探しの記事は見つかりませんでした。</h2>
<div class="contents">
<p>検索キーワードを変更し下記より再検索してください。</p><br />
<?php get_search_form(); ?>
</div>

<?php endif; ?>
上記のカスタマイズで新着記事一覧から「この投稿を先頭に固定表示」をチェックした記事を除外して表示することができました。
「if(!is_sticky()):」を利用することで、「固定表示」かどうかの判断がおこなえます。
賢威7で設定する場合
賢威7で同様のカスタマイズをおこなう場合、以下のように追記、調整していきます。
固定表示をチェックした記事の出力
●「メインインデックスのテンプレート (index.php)」に追記
<?php
$args = array(
    'posts_per_page' => 1,
    'post__in'  => get_option('sticky_posts'),
    'ignore_sticky_posts'  => 1
);
$the_query = new WP_Query( $args );
if ( $the_query->have_posts() ) :
while ( $the_query->have_posts() ) : $the_query->the_post();
?>

<div class="welcome m100-b">
<h2><?php the_title(); ?></h2>
<div class="txt"><?php the_content(); ?></div>
</div>

<?php endwhile; endif; wp_reset_postdata(); ?>
賢威6.2と同様の記述でいまのところ問題ないようです。
上部の「最新情報」で先頭固定を実装する場合
賢威6.2と同様に「functions.php」内で「ignore_sticky_posts」を「0」とすることで表示させることが可能なようです。
if ($target == "new") {

		if (preg_match("/^[0-9]+$/", mb_convert_kana(the_keni('new_info_rows'), "n"))) $num_of_posts = mb_convert_kana(the_keni('new_info_rows'), "n");
		$res_data .= "<h2>".__('Latest Info','keni')."</h2>\n";
		if (is_array($ex_ids) && count($ex_ids) > 0) {
			$r = new WP_Query(array('showposts' => $num_of_posts, 'nopaging' => 0, 'post_status' => 'publish', 'cat' => $catid, 'ignore_sticky_posts' => 0, 'category__not_in' => $ex_ids));
		} else {
			$r = new WP_Query(array('showposts' => $num_of_posts, 'nopaging' => 0, 'post_status' => 'publish', 'cat' => $catid, 'ignore_sticky_posts' => 0));
		}
	} else {
上部の「最新情報」から固定した記事を除外
「最新情報」から先頭固定をした記事を除外する場合、こちらも賢威6.2の対応と同様に「’post__not_in’ => get_option( ‘sticky_posts’ )」を追記することで対応します。
if ($target == "new") {

		if (preg_match("/^[0-9]+$/", mb_convert_kana(the_keni('new_info_rows'), "n"))) $num_of_posts = mb_convert_kana(the_keni('new_info_rows'), "n");
		$res_data .= "<h2>".__('Latest Info','keni')."</h2>\n";
		if (is_array($ex_ids) && count($ex_ids) > 0) {
			$r = new WP_Query(array('showposts' => $num_of_posts, 'nopaging' => 0, 'post_status' => 'publish', 'cat' => $catid, 'ignore_sticky_posts' => 0, 'category__not_in' => $ex_ids, 'post__not_in' => get_option( 'sticky_posts' )));
		} else {
			$r = new WP_Query(array('showposts' => $num_of_posts, 'nopaging' => 0, 'post_status' => 'publish', 'cat' => $catid, 'ignore_sticky_posts' => 0, 'post__not_in' => get_option( 'sticky_posts' )));
		}
	} else {
下部の新着情報から除外する場合は「cont.php」を調整
●修正前
if (have_posts()) {
	while (have_posts()) : the_post(); ?>

	<article class="section-wrap">
		<div class="section-in">
		<header class="article-header">
			<h2 class="section-title"><a href="<?php the_permalink() ?>" title="<?php the_title_attribute(); ?>"><?php echo esc_html(get_the_title()); ?></a></h2>
			<p class="post-date"><time datetime="<?php the_time('Y-m-d'); ?>"><?php the_time(get_option('date_format')); ?></time></p>
			<?php if (the_keni('pv_view') == "y" && preg_match("/^[0-9]+$/",getViewPV(get_the_ID()))) { ?><p class="post-pv"><?php viewPV(); ?>PV</p><?php } ?>
<?php {
			$site_url = site_url();
			if (!preg_match("/\/$/", $site_url)) $site_url .= "/";
				$category_data = get_category_keni();
				if (!empty($category_data)) echo "<div class=\"post-cat\">\n".$category_data."\n</div>\n";
			} ?>
<?php $post_type = get_query_var('post_type');
			if ((!empty($post_type) && the_keni('social_archive_view') == "y") || (is_front_page() && empty($post_type) && the_keni('social_top_archive_view') == "y") || (!is_front_page() && the_keni('social_archive_view') == "y")) get_template_part('social-button'); ?>
		</header>
		<div class="article-body">
		<?php if (get_the_post_thumbnail()) echo '<div class="eye-catch"><a href="'.get_the_permalink().'" title="'. the_title_attribute('echo=0') .'">'.get_the_post_thumbnail()."</a></div>\n"; ?>
		<p><?php echo strip_tags(get_the_excerpt()); ?></p>
		<p class="link-next"><a href="<?php the_permalink() ?>">続きを読む</a></p>
		</div>
		</div>
	</article>

<?php endwhile;
	pager_keni();
}
?>
●修正後
if (have_posts()) {
	while (have_posts()) : the_post(); ?>
<?php if(!is_sticky()): ?>
	<article class="section-wrap">
		<div class="section-in">
		<header class="article-header">
			<h2 class="section-title"><a href="<?php the_permalink() ?>" title="<?php the_title_attribute(); ?>"><?php echo esc_html(get_the_title()); ?></a></h2>
			<p class="post-date"><time datetime="<?php the_time('Y-m-d'); ?>"><?php the_time(get_option('date_format')); ?></time></p>
			<?php if (the_keni('pv_view') == "y" && preg_match("/^[0-9]+$/",getViewPV(get_the_ID()))) { ?><p class="post-pv"><?php viewPV(); ?>PV</p><?php } ?>
<?php {
			$site_url = site_url();
			if (!preg_match("/\/$/", $site_url)) $site_url .= "/";
				$category_data = get_category_keni();
				if (!empty($category_data)) echo "<div class=\"post-cat\">\n".$category_data."\n</div>\n";
			} ?>
<?php $post_type = get_query_var('post_type');
			if ((!empty($post_type) && the_keni('social_archive_view') == "y") || (is_front_page() && empty($post_type) && the_keni('social_top_archive_view') == "y") || (!is_front_page() && the_keni('social_archive_view') == "y")) get_template_part('social-button'); ?>
		</header>
		<div class="article-body">
		<?php if (get_the_post_thumbnail()) echo '<div class="eye-catch"><a href="'.get_the_permalink().'" title="'. the_title_attribute('echo=0') .'">'.get_the_post_thumbnail()."</a></div>\n"; ?>
		<p><?php echo strip_tags(get_the_excerpt()); ?></p>
		<p class="link-next"><a href="<?php the_permalink() ?>">続きを読む</a></p>
		</div>
		</div>
	</article>
<?php endif; ?>
<?php endwhile;
	pager_keni();
}
?>
修正するファイルは「cont.php」となりますが、賢威6のカスタマイズと同様に「if(!is_sticky()):」を利用した条件分岐で対応していきます。
まとめ
いかがでしたか?
今回紹介したWordPressの機能は意外と知らない方は多いかもしれません。
もちろん直接テンプレートをカスタマイズすることで、同じような体裁にすることは可能ですが、少しのカスタマイズで再現できるうえに、管理画面でウェルカムメッセージを調整できることは長く運営をしていくとかなり便利な機能かと思います。
サイトやブログを運営していくと「休暇のお知らせ」や「不具合情報」「訴求メッセージ」などトップページで掲載したい情報はたびたび変わってくるかと思います。
そのたびにテンプレートをカスタマイズするのは大変ですので、1つの記事で管理できると便利ですよね。
ただし、メッセージ用にガッツリカスタムしたい場合は「カスタム投稿」や「カテゴリ」を利用して、メッセージ専用の投稿管理をしていっても良いかもしれません。
目的によってカスタマイズの内容は変わってくるので今回紹介した方法がベストとは言いませんが、ピンときた方はぜひカスタマイズに挑戦してみてください!
「カスタム投稿」についてはまた別の記事でプラグインを交えて紹介できればと思います。